Festive manicures are making a delightful comeback, with gingerbread-inspired designs leading the trend. This charming style combines seasonal cheer with creative artistry, making it a favorite for anyone looking to elevate their holiday look. Achieving the perfect gingerbread nails requires attention to detail and the right techniques, ensuring your manicure stands out throughout the festivities.
Wichtigste Erkenntnisse
- Use high-quality brushes for detailed and precise gingerbread nail designs.
- Select festive colors like warm browns, whites, reds, and greens for authentic holiday nails.
- Prepare nails by removing old polish, buffing, and moisturizing for better adhesion and durability.
- Apply a base coat for a smooth foundation that extends the longevity of your manicure.
- Seal the design with a glossy top coat to protect details and ensure long-lasting festive nails.
Choose the right nail tools and brushes
Die Auswahl der appropriate nail tools and brushes is a crucial step in creating perfect gingerbread nails. High-quality brushes with fine, precise bristles allow for detailed designs, such as tiny patterns and delicate accents that mimic gingerbread cookies and icing. Investing in small detail brushes, striping brushes, and dotting tools can greatly enhance your control over the intricate elements of the design.
It is also important to select nail tools that are durable and easy to clean, as this ensures clean lines and prevents any color bleeding or smudging. Opt for tools made from stainless steel or high-grade plastic, which withstand repeated use without losing their shape or precision. Additionally, consider having a variety of brush sizes on hand so you can work on different details, from large backgrounds to tiny embellishments.
Proper maintenance of these tools is key to achieving professional-looking results. After each use, make sure to thoroughly clean brushes with appropriate solvents or brush cleaner solutions, especially if multiple colors are used during one session. Well-maintained tools provide more consistent application, making it easier to create clean, crisp lines and intricate holiday-themed designs like gingerbread men or icing swirls. Overall, selecting the right tools tailored to festive manicure needs makes all the difference between a good and an exceptional result.
Weitere Informationen: The Impact of Travis Kelce and Taylor Swift’s Relationship on Celebrity Culture
Select festive gingerbread-inspired colors and shades
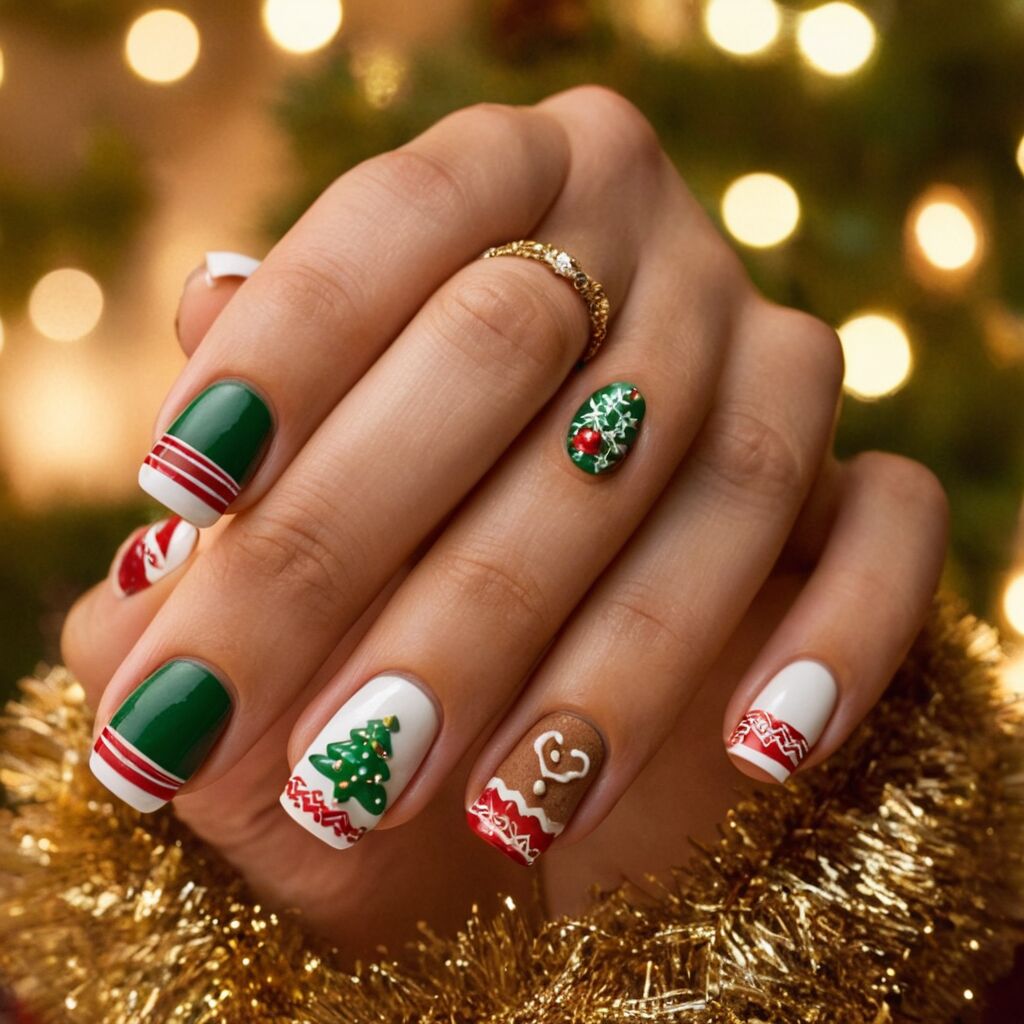
When creating gingerbread-inspired nails, selecting festive colors and shades is a vital step to achieve an authentic holiday look. Start with warm browns that resemble freshly baked gingerbread cookies; these tones serve as the perfect base for your design. Incorporate lighter shades such as creamy whites or beige for accents like icing details, giving a realistic and tempting appearance. Bright reds and vibrant greens can be added sparingly for decorative elements, enhancing the overall festive spirit without overwhelming the primary palette.
It’s beneficial to choose high-quality nail polishes with rich pigmentation. This ensures that the colors remain vibrant and true throughout wear. Matte finishes can offer a cozy, rustic feel, while glossy top coats emphasize a fresh-from-the-oven shine—both suitable for different aesthetic preferences. Additionally, gel polishes can provide longer-lasting results, maintaining their vibrancy through the busy holiday season.
Pairing harmonious shades allows for creative versatility in design. Couples of contrasting yet complementary colors can highlight intricate patterns, such as gingerbread men or swirling icing. Mixing textures—matte bases with shiny details—adds depth and dimension, making every detail stand out beautifully. Thoughtful selection of colors and shades enhances not only the overall appearance but also reinforces the cheerful and inviting vibe characteristic of seasonal manicure trends.
Prepare nails with clean, moisturized surface
Before starting your festive gingerbread manicure, it is crucial to prepare the nails carefully. Begin by removing any old polish thoroughly, ensuring the surface is free of residues and oils that could interfere with adhesion. Using a gentle nail polish remover or acetone can help create a clean canvas for your design.
Next, gently buff the surface of each nail using a fine-grit buffer. This step smooths out ridges and imperfections, allowing the polish to apply more evenly. Be sure not to over-buff, as this can weaken the nail structure; rather, aim for a uniformly matte finish that enhances adhesion.
Moisturization plays a vital role in achieving flawless results. Apply cuticle oil around the edges, massaging it in to nourish the skin and promote healthy growth. Afterward, wash your hands thoroughly and dry them completely. Follow up with a light layer of moisturizer or hand cream on the surrounding skin, but make sure your nails remain dry and free from excess moisture before proceeding.
Having a clean, moisturized surface improves both the appearance and durability of your holiday manicure. It helps prevent chipping and peeling, ensuring your gingerbread-inspired design stays fresh and vibrant longer throughout the festivities. Proper preparation creates an optimal environment for detailed artwork, making your seasonal nails truly stand out.
Creativity is intelligence having fun. – Albert Einstein
Use base coat for long-lasting design integrity
Applying a base coat is a crucial step in ensuring the longevity and appearance of your festive gingerbread nails. It provides a smooth surface that helps the subsequent layers of polish adhere better, reducing the likelihood of chipping or peeling over time. A quality base coat also acts as a protective barrier, shielding natural nails from staining caused by darker shades or pigments used in holiday-inspired designs.
When selecting a base coat, look for one that offers good adhesion and dries quickly to facilitate efficient application. Applying it thinly and evenly across each nail creates an optimal foundation for your chosen colors and decorations. Once applied, give the base coat sufficient time to dry and set before adding the colored polish. This prevents smudging and ensures each layer remains crisp and clean, which is especially important when working with detailed gingerbread patterns.
Using a proper base coat not only enhances the visual outcome but also extends the durability of your manicure. Your holiday design will stay vibrant and intact longer, even through regular hand movements and exposure to diverse environments. Incorporating this simple yet vital step results in a professional-looking finish that can endure the busy festivities with minimal touch-ups, keeping your nails looking perfect throughout the season.
Weitere Informationen: The Rise of Jorts: How Denim Shorts Became a Fashion Staple in Summer Wardrobes
| Schritt | Beschreibung |
|---|---|
| Choose the right nail tools and brushes | Select high-quality brushes with fine bristles and durable tools to enable detailed and precise designs for festive gingerbread nails. |
| Select festive gingerbread-inspired colors and shades | Pick warm browns, whites, and accent colors like red and green to create an authentic holiday look with vibrant, long-lasting nail polish. |
| Prepare nails with clean, moisturized surface | Remove old polish, buff nails gently, and apply moisturizer to ensure a smooth, clean surface for optimal adhesion and design durability. |
| Use base coat for long-lasting design integrity | Apply a thin layer of base coat to create a smooth foundation that adheres well and protects natural nails, extending the lifespan of the manicure. |
| Apply warm brown and white polish accents | Use selected shades to create background tones and accents like icing or cookie details for a realistic gingerbread look. |
| Add detailed gingerbread patterns and decorations | Use fine brushes and tools to craft patterns such as gingerbread men, icing swirls, and other seasonal embellishments. |
| Seal design with a glossy top coat | Finish with a clear top coat to add shine and protect the design from chipping, ensuring long-lasting results. |
| Maintain nails with regular touch-ups | Touch up chips and reapply top coat as needed to keep the festive look fresh throughout the holiday season. |
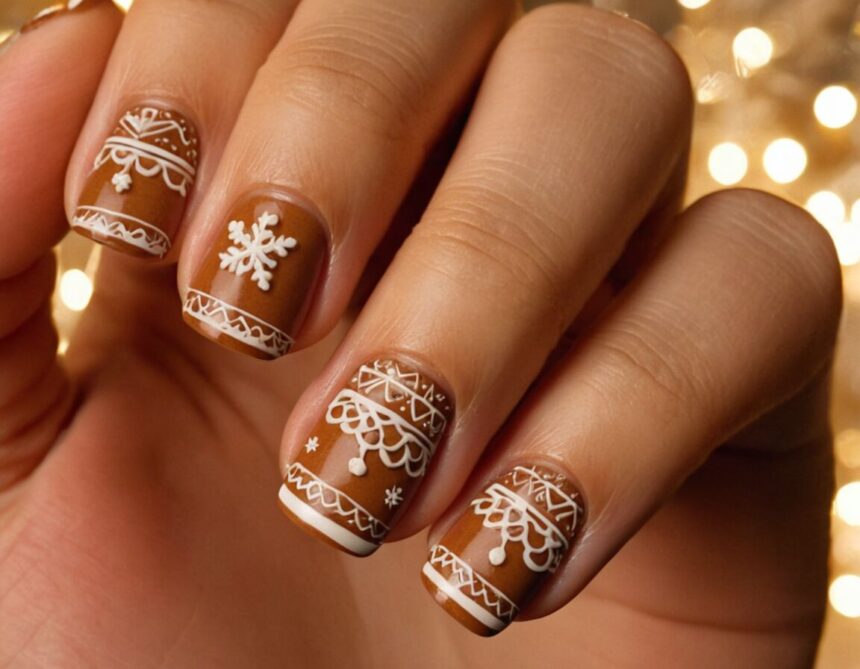
Apply warm brown and white polish accents
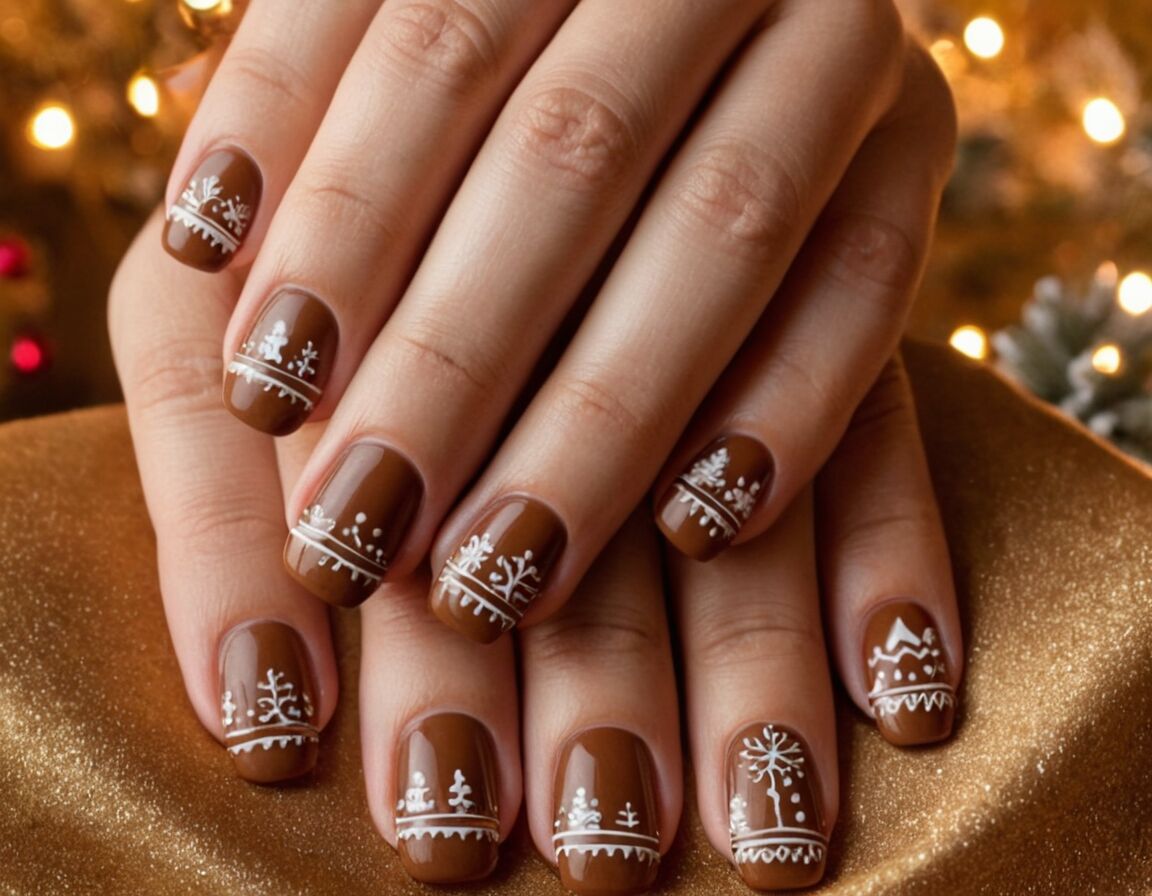
Verwendung von warm brown polish is fundamental when creating a realistic gingerbread appearance on your nails. This shade serves as the base color, mimicking the inviting hue of freshly baked cookies. To achieve an even and smooth application, start by applying thin, consistent coats, allowing each layer to dry thoroughly before adding the next. This prevents streaks and creates a rich, uniform background that will make your other decorations stand out more vividly.
White accents play a key role in adding detail to the design. They are perfect for highlighting features like icing, snowflakes, or decorative dots, giving your manicure a textured and dimensional look. When applied, use a fine-tipped brush or dotting tool to place white polish accurately, aiming for precision with each stroke. The contrast between the warm brown base and white highlights enhances the depth of every element, making the patterns appear more lifelike and festive.
For best results, consider layering techniques—starting with the warm brown as the main backdrop and then carefully adding white accents on top. Allow each segment to set slightly before working on neighboring areas to prevent smudging. Variations in density and placement can add interesting visual effects, creating the charmingly imperfect, cozy appearance typical of gingerbread motifs. Overall, this combination of shades brings warmth and cheerfulness to your holiday manicure while emphasizing intricate details through thoughtful application.
Mehr dazu: The Best Spots to Watch the Sunset Today: A Guide for Nature Lovers
Add detailed gingerbread patterns and decorations

To truly capture the charm of gingerbread nails, focus on adding intricate patterns and decorations. Start by selecting a fine-tipped brush or dotting tool suitable for precise work. Use white polish or icing-colored accents to create details such as tiny snowflakes, swirls, or even miniature gingerbread men. These elements add depth and character to your design, making each nail look festive and eye-catching.
When creating these decorations, remember that weniger ist oft mehr; small, well-placed details can have a stronger visual impact than larger, cluttered designs. Practice steady hand movements to ensure clean lines, especially when working with contrasting colors. If needed, lightly outline your pattern first with a fine brush before filling it in fully. This approach helps maintain symmetry and accuracy.
Decorative touches like tiny dots, icing borders, or tiny hearts contribute to an overall cozy and inviting appearance. Use different shades of white or cream to add shading or highlight specific parts of your patterns, enhancing their realism. Finish by carefully sealing your design with a glossy top coat to protect all detailed elements while giving your nails a shiny, finished look. With patience and attention to detail, your gingerbread-inspired motif will radiate holiday cheer and craftsmanship.
Seal design with a glossy top coat
Applying a glossy top coat is the final step that can significantly enhance your festive gingerbread nails. It not only adds a beautiful, shiny finish but also helps to protect your intricate design from everyday wear and tear. A high-quality top coat acts as a barrier, sealing in the details and ensuring that your carefully crafted patterns stay vibrant for an extended period.
When choosing a top coat, opt for one with good adhesion properties and quick-drying formula. This allows for a smooth application without smudging or dragging your artwork. Apply it evenly across all nails and make sure to cover even the edges to prevent chipping along the sides. Waiting a few minutes after the initial layer will help the top coat set properly before adding any additional layers or decorations.
Not only does a glossy seal give your ornament a refined look, but it also provides extra durability against daily activities such as typing or washing hands. Moreover, the shine enhances the contrast of white icing-like accents and highlights on your gingerbread designs, making them stand out even more. For added longevity, some prefer to use a fast-drying or gel top coat, which offers a more durable and flawless finish, keeping your holiday manicure looking pristine throughout the celebrations.
Maintain nails with regular touch-ups
Maintaining your gingerbread-inspired manicure with regular touch-ups is key to preserving its festive charm throughout the holiday season. As time passes, small chips or scratches can appear, especially with frequent hand movements and daily activities. Addressing these imperfections promptly helps keep the overall look fresh and vibrant. Keep a small stash of your nail polish colors handy—particularly the brown, white, and accent shades used in your design—to quickly repair any minor damages.
Applying a thin layer of top coat every few days not only boosts the shine but also acts as a protective barrier against chipping and fading. This step extends the life of your detailed artwork without requiring a complete redo of your manicure. When touching up, be cautious to match the existing colors closely and use steady brush strokes for seamless blending. For more resilient results, consider a gel top coat, which can be cured under a UV or LED lamp for additional durability.
Regular maintenance also involves keeping your cuticles healthy and hydrated by applying cuticle oil once daily. Healthy cuticles provide a neat framing for your designs and prevent premature peeling that could compromise the manicure’s appearance. With consistent care, your gingerbread nails will continue to radiate seasonal joy and craftsmanship well beyond the initial application.
FAQ: Ihre Fragen werden beantwortet
What other holiday-themed nail designs complement gingerbread nails?
How long does a gingerbread manicure typically last?
Can I create gingerbread nails at home or do I need a professional salon?
What are some tips for avoiding smudges during the design process?
Are there any special care instructions for gel gingerbread nails?
Referenzen: